Importing Data into CreamSoda with spreadsheets
You can effortlessly migrate your data to CreamSoda, regardless of whether you currently manage your sales data using spreadsheets or another CRM system. Let's begin by diving into the process of importing your data into CreamSoda. This step is crucial for bringing your existing information, allowing you to leverage CreamSoda's powerful features to manage your business more effectively.
Data Types You Can Import
CreamSoda supports various types of data for import, including Contacts, Deals, and Products. We recommend that you import your Contacts before any other data types in order to get the most out of the import functionality.
Getting Ready before an Import
Before you embark on the import process, it's essential to consider several factors to ensure a smooth transition of your data into CreamSoda.
1. Preparing the Spreadsheet
- Eliminate formulas – Start with a clean spreadsheet devoid of any formulas. You can use this spreadsheet template for this. If your existing spreadsheet relies on formulas or data-linking to populate cell contents, transfer the data to a new sheet without these formulas.
- One tab per spreadsheet – Ensure each spreadsheet contains only one tab with data. If your spreadsheet consists of multiple tabs, separate them into individual files and import them individually.
- Avoid special symbols – Exclude symbols in numeric or monetary fields within your spreadsheet. For instance, the column for deal value should display only the number "5000" without any accompanying symbols like "$5000".
- For improved readability, ensure that the names of the columns are provided in the first row of the spreadsheet.
- When importing multiple values in a single Excel cell in CreamSoda, separate the values with a semi-colon. This applies to multi-select lists, person selection, company selection, and user selection fields, as well as CreamSoda's phone and email fields. For example, if a Person selection field includes "John Doe" and "James Deen", import it as "John Doe; James Deen". Similarly, if a Person record has two email addresses, "info@acmeinc.com" and "mail@acmeinc.com", format them as "info@acmeinc.com; mail@acmeinc.com".
- When importing a date or time range value in a single Excel cell in CreamSoda, separate the values with a dash. For example, a Date range field should be formatted as "January 1, 2024 - January 5, 2024".
2. Mandatory Fields
One crucial aspect to keep in mind before you start importing data into CreamSoda is the inclusion of mandatory fields. These native fields are necessary for each type of data you're importing. Here's a list of mandatory fields for each data type:
| Data Type | Mandatory Field |
| Contact |
Person Name or Person First Name or Person Last Name 💡To avoid duplicate records, we recommend that you import the Email Address field while importing contacts.
|
| Contact |
If Company records are being mapped: Company Name |
| Deal | Deal Name |
| Deal |
Pipeline Name 💡Make sure you've entered the precise name of the Pipeline in this column. You can find the Pipeline name by clicking here.
|
| Deal |
Deal Stage 💡Ensure that the Deal Stage name in this column is accurate. You can locate the Deal Stage by clicking here and navigating to the corresponding Pipeline record.
|
| Deal |
If a deal is in a Cancelled Deal Stage: Deal Cancel Reason |
| Deal |
If a deal is Closed (Either Won or Lost): Win Lost Date |
|
If a deal is in Delivered Stage: Actual Delivery Date |
|
| Product | Product Name |
3. Custom Fields
If your spreadsheet contains data fields that are not natively supported by CreamSoda CRM, you'll need to add custom fields. Custom fields allow you to capture data that is specific to your business. For example, "Home Address" is not a native field in CreamSoda. In order to record the Home Address of a contact, you have to create a Custom Property for the Person resource.
If you designate a custom field as mandatory, ensure that you include the corresponding data in your spreadsheet. For instance, if you require the "Home Address" field for all Person resources, make sure to provide the home address for every contact you import.
Before importing a custom property, always make sure that the "Display property in Create page" is turned on for the property. To ensure a custom property is displayed on the Create page, first click on "... More Options" in the side menu. Scroll to Custom Properties and click "Manage Custom Properties." Next, click the Settings link next to the resource type of the custom property. Find and edit the custom property, then ensure the "Display property in Create page" option is turned on.
💡If you're bringing in a custom field that's like a dropdown menu in CreamSoda, check that the data you bring in matches one of the options in the list exactly. If it's a multiple-choice dropdown, your data needs to match one or more of the options exactly. If you're picking more than one option, separate them with a semi-colon.
Start Importing data into CreamSoda
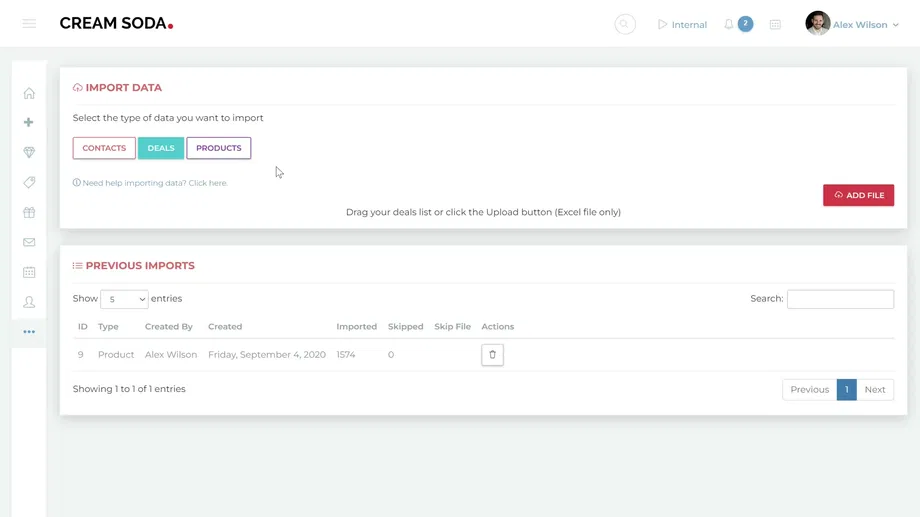
To import data into CreamSoda, click on "... More Options" from the side menu bar. Scroll down to the Import section and click on "Import Data" button.
Step 1: Choose the data type you want to Import
From the top-left corner of the page, select the type of data you want to import.
Click on the "Add File" button and select the spreadsheet you want to import. CreamSoda only accepts Excel files with .xls or .xlsx extension.
Step 2: Map columns to CreamSoda data fields
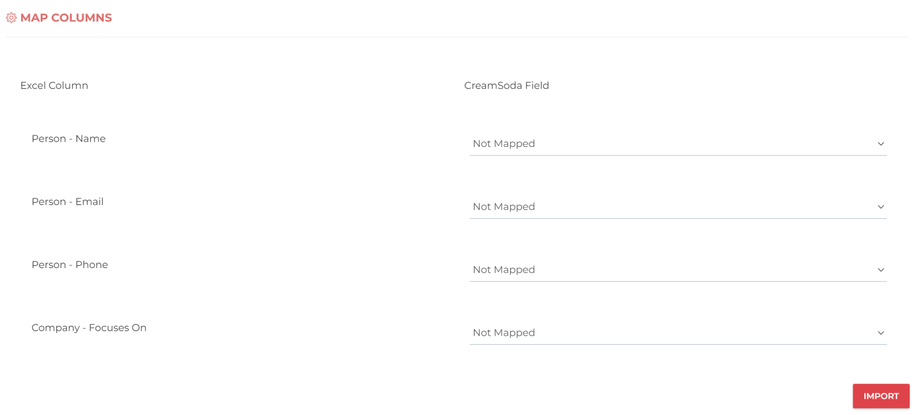
On the left side of the screen, you'll find the Excel column names, while the CreamSoda data fields are listed on the right side. Match each Excel column you wish to import with the corresponding CreamSoda field.
Hit the "Import" once this step is completed.
Now, CreamSoda will initiate the import process. The duration of this step may vary based on the volume of data being imported. Please refrain from navigating away from the page until this process is completed. 
Once Data Import is Completed
Step 1: Fix errors
Upon completion of the import process, please scroll down to the Previous Imports section. The initial entry in the table indicates whether CreamSoda successfully imported the data.
The Imported column shows the count of records successfully brought into CreamSoda. Conversely, the Skipped column illustrates the number of records unable to be imported, typically due to errors.
When CreamSoda encounters errors during the import process, it automatically generates a Skip File. This file serves a dual purpose in your import journey:
- It provides a comprehensive overview of any errors encountered during the import process, facilitating easy identification and resolution.
- It empowers you to rectify these errors directly within the file, ensuring smooth re-importation into CreamSoda. Remember to remove the error column to maintain clarity and accuracy in your data.
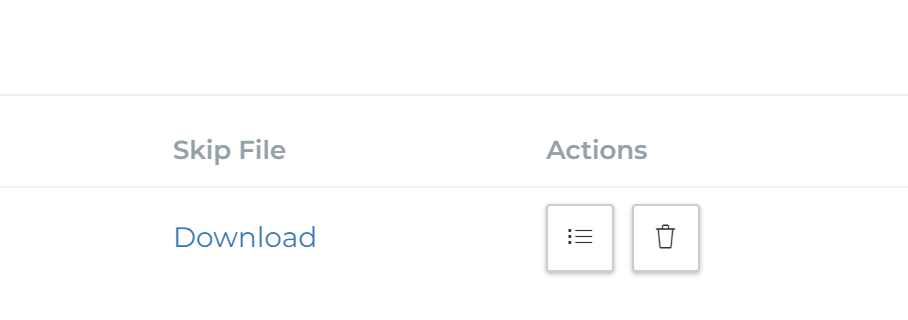
To review the Skip File, click the "Download" link, then open it for examination.
Resolve the issues highlighted under the Issue column of the Skip File and re-import this file to complete the import process.
Step 2: Export Imported data to a List
If you have a particular sales or marketing objective in mind for the imported data, CreamSoda offers the flexibility to:
- Incorporate the imported data into an existing Static List.
- Establish a new Static List with the imported data.
Once you've compiled your List, you can leverage it to:
- Send customized bulk emails to contacts listed.
- Analyze the data for valuable insights or engage in manual follow-ups with the listed contacts.
To export the data to a list, click on the List button under the Actions column and follow the steps.
Undo the Import
If you need to revert the import and discard the data you have just imported, click on the Delete button. This action will delete the data you have just imported into CreamSoda.


