Create and Manage Lead Forms
In this guide, you'll learn how to create and manage lead forms to capture visitor information and generate leads for your business. These forms can be customized for various purposes like contact forms, booking forms, consultation forms, and more. Let’s get started!
Overview of Lead Forms
Types of Forms
- Contact Form
- Booking Form
- Consultation Form
- Questionnaires
- And many more!
Key Features
- Updates: Receive updates from visitors using lead forms.
- Compliance: CreamSoda’s lead forms comply with GDPR and PIPEDA regulations.
- Consent Checkboxes: Show or hide based on the visitor’s location, and make them mandatory or optional.
- Audit Log: Keep detailed records of visitor consent for legal and compliance purposes.
- Customizable Landing Pages: Create landing pages that you can direct visitors to.
- All Your Data in One Place: CreamSoda stores Lead Form information directly in the Person, Company, or Deal records, so you don’t have to worry about disjointed data being stored in multiple places. This way, you stay in control of the information you collect. It's also important for privacy rules like GDPR and PIPEDA, helping you stay compliant.

Creating a Lead Form
Accessing Lead Forms
1. Click on ...More options from the main menu.
2. Scroll down to Lead Form section.
3. Click on Manage Lead Form button.
4. Click on the Create Lead Form button and choose Create Lead Form from the drop down list.
Steps to Create a Lead Form
Step 1: Form
Name: Add an internal name for the Lead Form. This will not be shown to visitors.
Background Color: Choose the background color for the form page.
Round edged inputs?: Decide if the form button and inputs should have rounded edges.
 |
 |
Column: Select the number of columns for form fields (applies to desktop and tablet only).
| One-Column | Two-Column | Three-Column |
 |
 |
 |
Form Design: Choose from no border, simple border, or card appearance.
| No Border | Border | Card |
|
 |
 |
Introductory Message: CreamSoda enables you to design your Lead Form as a landing page.
A landing page is a web page where a visitor can learn more about your services. If they like it, they can choose to either purchase your service or leave their contact details.
To design your landing page, enter the message you want your visitors to see. You can use rich text formatting so that your message can stand out.
If you do not want your Lead Form to function as a landing page, simply keep this field blank.

Description: Add verbiage to describe how a visitor will benefit by signing up. Use rich text formatting to improve the look and feel of this section. You can also choose to leave this field blank.
Assign To: Specify the team member for the Person and Deal records. You can also set up a round-robin assignment. If Save Updates on Resubmit switch is activated, CreamSoda will first look for an existing resource. If it finds one, it will not update the ownership of these resources.
Notify Owner on Submit: Notify the lead owner and an additional email address upon form submission.
Create Deal on Submit: Create a deal in a specific Sales Pipeline upon form submission.
Save Updates on Resubmit: Update existing Person records instead of creating duplicates.
Save Updates to Latest Active Deal: Update the latest active deal instead of creating a new one.
Collect Payment: You can collect payment from a visitor by turning this functionality on. Depending on the Payments integration you choose under the Payment Service, CreamSoda will collect payment from the visitor once the form is submitted.
By activating Make Payment Mandatory, you can ensure that a visitor cannot successfully submit a form without making a payment. Turn this function off to make payment optional. This functionality will not work if you choose PayPal integration. Payment is always mandatory when PayPal is chosen as a Payment Service.
Specify the Payment Amount and the Payment Currency. Note that PayPal and Stripe only support a particular set of currencies.
Specify a Tax Rate if you want to collect tax during the payment process. You can also specify the name of the tax you are collecting, such as GST, HST, VAT, etc. using the Tax Name input.
Enable Email Receipt to Customer to automatically send a receipt to the customer after payment in successfully received. You have the ability to include additional information in the receipt using the Receipt Details field.
Save Visitor’s Location Details: Track and save the visitor’s location and time zone.
Collect consent to communicate: Collect consent based on the visitor’s location. Visitor's location is determined based on their IP address.
Make Consent checkbox mandatory: Make consent mandatory in certain regions.
Default Consent: Record implicit consent if the checkbox is optional. This is applicable if you have PIPEDA privacy law turned on for your account.
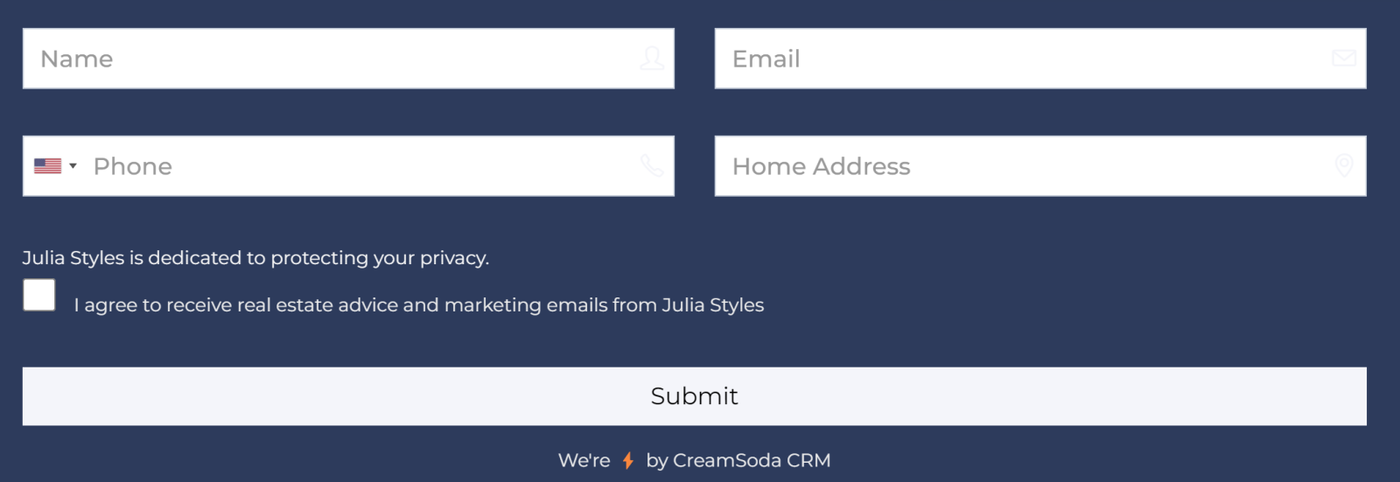
Consent Checkbox Text: Customize the text and color of the consent checkbox.

Privacy Notice: Design your Privacy Notice to appear above the Submit button.
Click Next to move to the Intro section.
Step 2: Design
Form Fields: Choose and design the form fields and submit button. If you cannot find your desired field, you can create it using the custom fields functionality.
Add Form Fields: Click the + button to add form fields.
Settings: Customize the look and feel of each form field.
Reorder Fields: Use the drag icon to reorder fields.
Submit Button: Add and customize the submit button using the Lead Form Fields dropdown.
Click Next to proceed.
Step 3: Post
Display a custom message or allow file downloads after form submission. To allow download of files, such as lead magnet, Use the Manage file tutorial to upload files and make links public.

Click Next.
Step 4: Preview
Preview the form you created. If you need to make changes, click Previous button. Resubmit the form after making changes.
Embedding a Lead Form
Steps to Embed
1. Click on ...More options from the main menu.
2. Scroll down to Lead Form section.
3. Click on Manage Lead Form button.
4. Choose your desired Lead Form and click on the Copy embed code button.
5. Paste this script into your external website’s editor.
For custom embed code, use the Copy link button to get the form link and write custom code based on your needs.
Sharing a Lead Form
Steps to Share
1. Click on ...More options from the main menu.
2. Scroll down to Lead Form section.
3. Click on Manage Lead Form button.
4. Choose your desired Lead Form and click on the Copy link button.
5. Share this link via email, social media, or any preferred method.
With these steps, you can efficiently create, manage, and share lead forms in CreamSoda to capture valuable visitor information and generate leads. Happy form building!